
We’re currently feeding our goats and chickens organically for 6 cents a pound. This is how we’re doing it:
I have friends who are SO much smarter than I am!
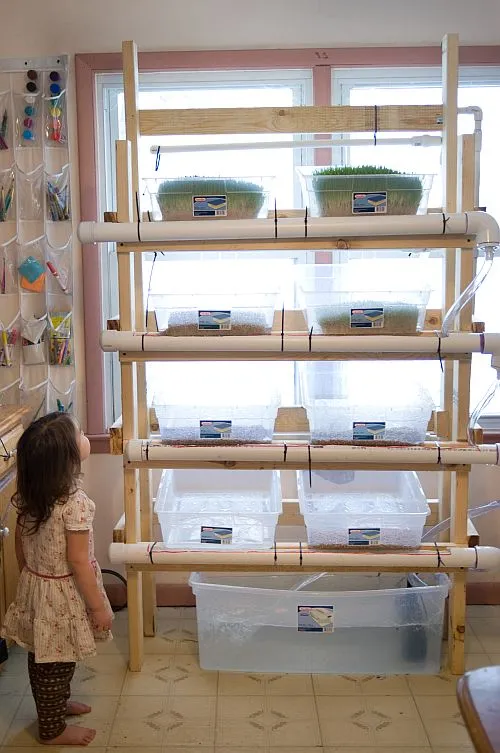
This is a hydroponic fodder system (“hydroponic” basically means growing plants in water, without soil.) Using this system, we are growing roughly 6lbs of edible – and more nutritious – barley grass for every pound of barley seed. Other people have written about this, before (just do a quick google search for “fodder system”) but I’ll run through the basics of how it works before I explain how we set our system up (or rather, how our awesome friend Patrick set it up with a little bit of help from us!)
To do this simply (without the really cool shelf and pump system pictured above), you can get 15 appropriately sized tupperware bins (the size will depend on how much seed you’re sprouting,) and drill small holes into 7 of them. The holes should be just a bit smaller than the seed your using, so it won’t fall through. I drilled my holes along the front of the bin, so that I could saturate the seeds and tip the containers up in order to drain them. I did this by setting them up inside the second set of bins (the ones without holes) and tipping them forward a bit so the water would drain toward the front and out the holes, into the second set of bins (I then re-used this water, later.) The last bin is used for your pre-soak.
Day 1: Pre-soak your sprouting seed in water (if you have problems with mold, a solution of bleach water is recommended.) This is left to soak for 12 hours (I usually start these in the morning and soak mine in a bleach solution [I’m currently experimenting with apple cider vinegar] until bedtime, and then rinse well and soak in plain water until morning.
Day 2: Drain your soaking seeds and spread them evenly into one of the plastic tupperware bins that have holes in the bottom, and set this up inside a bin without holes, for drainage. The common recommendation is to spread them roughly 3/4 inches thick. Start a new bin of seeds to soak. From this point on, you’ll be watering your seeds four times each day.
Day 3-7: Each day, you’ll start a new bin of seeds to soak, and water the rest of your bins approximately every four hours. The easiest way I’ve found to water them is through “flood and drain.” Just pour enough water in to wet the seeds, let it soak for a little while, and then drain it off.
Day 8: Harvest your grass. Just lift it out of the container, cut or tear it up into smaller chunks or pieces, and feed it to your animals! Wash out your container with soap and water and use that container for the seeds coming out of the pre-soak.
In this way, you’re harvesting feed every day and starting a new set of seeds each day!
.
Now, this system has one major downfall. As much as I love a good excuse to stay home, it just wasn’t very practical for me to water my barley every four hours. “No, I’m sorry, I can’t come to visit, I have to water my barley.” So my husband and our friend Patrick built me an automated barley sprouting system!!! Using wood, PVC pipe, zip ties, and a few other simple things, they built a shelf that would hold my bins at a slight angle, pipes that would run water to each bin, and gutters to catch the excess (which ends up in the large bin at the bottom, and is pumped back through with a submersible fountain pump.) It’s plugged in to an automatic timer, so it turns itself on every 4 hours, and turns itself off after running for fifteen minutes.
I don’t have expect specifications for anything, but here is a picture run through of how it works:

In this picture is the tube that comes out from the pump and attaches to the PVC pipe, to take it up to each pipes that run over the bins.
Here’s a full length shot, and you can see the pipes coming off and over the bins:

The flow of water is “regulated” with valves:

(I use the word “regulated” loosely here… we have some learning to do, regarding plumbing, as it took quite a bit of fenagling to get the pressure right… too much or too little on any of the bottom three made the top turn off altogether!)
Here’s a picture of it, running:

Each bin sits on top of the lid it came with, which is screwed into the wood, to stay in place. This keeps the bins from sliding and also works to catch excess water if the bins get too full (I don’t have a picture of it, but we drilled large holes near the top of the bins, for overflow.) The front of the bins and the lids both have holes for drainage, and PVC pipe cut in half acts as a gutter for the water to drain into, and vinyl tubing takes the water from one gutter to the next, and finally into the bottom reservoir:

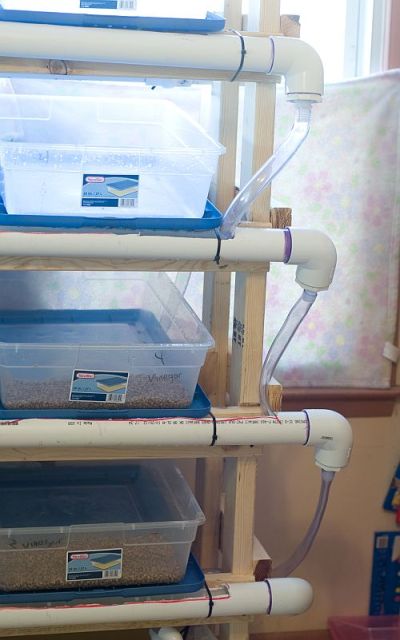

And I thought I should probably mention one of the most important parts – the overflow pipe:

See how the pipe goes just above the last line of sprinklers, and water can bypass the sprinkler and go into tubing (which also drains into the bin at the bottom)? This is so that any water that doesn’t go through the pipes to water the barley can still make it back to the reservoir (and my system doesn’t explode.) 🙂
Here is a picture of the barley in various stages of development:
Day 2 (just out of the soaking bin)

Day 4:
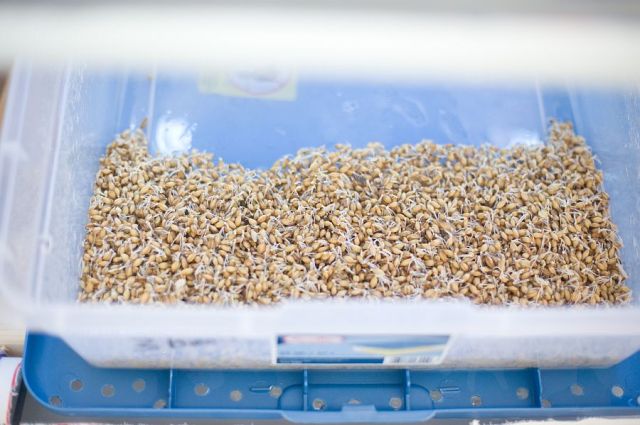
Day 6:

(Notice our bins are much larger than what we need right now. We did this so that we’d have plenty of room to expand when we get our meat birds, and when the baby goats come.)
We haven’t worked out all the kinks yet, I’m still trying to figure out what kind of lighting is best (which is why I have a couple of baby blankets covering the bottom half of the windows), and I’m still trying to make it fool-proof so it can be left automated even when I’m not home (today I accidentally put one of the bins in backwards, so it wasn’t draining! SO glad my daughter caught that before 110 quarts of water ended up all over the kitchen floor!!!)
But all in all I am absolutely THRILLED with it! It makes things so incredibly easy and the best thing is that I’m going to be able to feed ALL of our animals organically for even LESS than what we’d pay for non-organic feed! Pretty cool, huh?
.
Related Articles:

Pingback: Five Little Goats… | Rina Marie
Genius!
cool
Plz tell me the specification of timer…
it’s just a typical outlet timer we picked up from Lowes or Office Depot.
Pingback: Our Cups Runneth Over! | Rina Marie
Love this shelving idea. Beats my tubs sitting all around. I do have a question about the water tub on the floor. How often do you change the water & how do you change out that much water?
Carolyn, we usually change the water every week or two, and we just siphon it out with a hose. We do want to figure out some other way of doing things, though, because we’ve had a big issue with mold and cruddy stuff in the pipes, and I’d also like a smaller tub to catch the water, because we’re wasting quite a bit of water with the large tub, because we have to keep the water level above the pump.
So I have a small ranch and have now setup a Fodder system to feed my cows and sheep. the best way to keep mold / algy / crud out of pips is to put Barley straw treatment in your primary tank. its sold at Tractor Supply and its just a small burlap bag that you place in your tank. it treats for up to 2 months. We use it for our cattle tanks and it does real well.
I am not experimenting with having gold fish in my primary tank to provide nutrients for the Barley.
I do like your setup. Thanks for the pics, it looks nice.
Stock Tank Secret Barley Straw Treatment for Livestock Water Tanks, 2 oz.
Jeremy, I’ve never heard of such a thing before, thank you very much for the tip! I’ll definitely try it!
Do you know how many cup or lbs of grain those particular tubs can hold?
I usually put about 6-8 cups of grain in each one (not sure off the top of my head how many pounds that is.) They can actually hold a little more, but I find that they sprout better with less grain.
Great. just want to find out if there is any kind of lighting or temparature that one need to use or control?
I’m not an expert, and I’m sure there are websites that give more detail, but I’ve found that it grows better, and without mold, during the winter (our house temp is around 70) and it will sprout better in the dark. I ended up putting up a screen on the lower half of the system to keep things darker from day 1-4 and then they’d move to the higher shelves, in the light, on days 5-8. Hope this helps!
Thats’ awesome system..i am from india..i need to feed my Goats too with this fodder…pls. tell me that how many kgs of wet fodder is sufficient for my goats per day which weighs 30 kgs?
Pls. help me on this regard..
Shivayogi
Hi, Shivayogi, the recommendation is to feed 2% of the goat’s body weight in fodder, 3% if she’s lactating or pregnant. Hope this helps!
My lactating goats are doing great being fed 5% of body weight. We’ve had an unusually cold winter and they’ve maintained their weight. That’s a nice setup. I fought mold when I recycled the water. You might try adding EM-1 or oxine to the reservoir to see if that helps.
Thanks for the suggestion!
I have my system all set up but was wondering about a few things….are you feeding your laying hens only the fodder? (I know oyster shell will be necessary) If so have you seen an increase or decrease in egg production? I have 150 hens and am trying to gauge just exactly how much to give them, I am using sandard greenhouse trays right now (but like your sterlite containers!) so I am told they will weigh approx 15 lbs each?
Susie, we are not currently feeding our laying hens the fodder, but we plan to start as soon as we can get another system built (currently the fodder from this one is going to our goats and cow.) We have fed chickens the fodder in the past (meat birds) and I can say that they eat it better when it’s shorter – harvested around day 3 or 4. As for how much it weighs, you can usually plan on a 6-7 fold increase after a full 7-8 day sprout, so the final weight will depend on how much seed you put in each tray and when you harvest it. I’ll try to follow up on this when we start feeding it to the laying hens.
Hello, thanks for sharing this with us. I have been researching these and i am so excited to get started. Just wanted to share with you something i read that might help your water situation. Instead of tilting the pans and watering each level i seen several that drill holes throughout the bottom of the pans and then water the top and you get a trickle down effect that waters the tubs below. You just have torotate your pans each day so the old ones are on top. Just a thought!
Thanks for the idea, April! We’re still working on ways we can improve this system, so that’s really helpful!
Pingback: In which we ask for help… | Rina Marie
Please confirm watering required every six hours or every four hours?
For how many minutes pump has to run?
Misnaaf, the general idea is to keep the barley moist, so you don’t want it to dry out. As it gets longer, it seems to need less frequent watering, but usually I just try to water it four times a day. Same principle applies to the pump, it only needs to run long enough to saturate all of the barley seeds (or roots, as it gets longer) and then it can stop.
Just getting started with this system in order to supplement our pasture raised beef cattle over this winter. How much bleach should we use?
I just put a “glug” of bleach in the soaking bowl… maybe 1/4 a cup?
How did the apple cider vinegar experiment work? We are certified organic and I don’t know if bleach will be approved.
I’m pretty sure that bleach is not approved for certified organic, but ACV didn’t work for us. I have heard that hydrogen peroxide can work against mold, but we haven’t tried it. The biggest issue is keeping your seeds clean and dry before they’re soaked, and keeping the temperature on the cool side (you can look up the exact temperature the big operations use, I can’t remember off the top of my head), the air circulated, and your containers very clean. These things should all help with mold.
Do they need direct sunlight? I was hoping to put them in a west facing window but I’m assuming that’s not enough light.
Kellie, I’ve actually found that they do better without much light, especially in the first few days when they’re just beginning to sprout.
Thats a nice looking grow system. I love seeing diy systems like this. Looks to be using just window light, no grow lights? Nice and efficient.
yes, just window light. Thanks!
Nice setup! Where do you find organic sprouting seed in those quantities without breaking the bank on shipping?
Thanks, Mark. We have an organic grain farm a few hours from us, so we often pick up barley when we’re out that direction, and we are also members of an organic co-op that supplies oat and barley.
Thanks for the reply. Sadly I have no such resource, but at least I can grow my own next season.
We haven’t even tried to grow our own, although that would be a worthwhile thing to do! I hope it works out well for you!
Maybe I am doing something wrong, but my sprouts are growing a lot more slowly than yours and I have a LOT of unsprouted seeds at the bottom. I am doing the bleach / soak etc and at day 4 putting the starting to sprout seeds in trays. They might be one inch deep but I don’t think more. I had what I thought was a white mold here and there, plus a mild “sour” odor. So I rinsed every tray very thoroughly, gently swishing the sprouted seeds in plenty of cool water, till they smelled fresh again. But it seems after that the the growth slows drastically and at day 7 I have a fairly thin batch of fodder plus about 1/2 the depth of unsprouted seeds. I am using good clean oats as I want to feed this to my horses and barley is expensive here for the amount I would need. Would it be better to just flow the water through and not stir seeds? Put less seeds in? Does the sour smell matter? Maybe the little fuzzy stuff is NOT mold?? ANY suggestions would be greatly appreciated.
Hi, Dorothy. A few things…
First, I’ve found that oats do take longer to sprout than barley and second, my barley is growing REALLY slowly now, due to the cold (what used to take 7 days is now taking about 9.)
If I understand correctly, You said that “at day 4” you’re putting the sprouts in trays. Does that mean your soaking them in bleach for three days, before putting them in seed trays? I usually only soak them for about 12 hours.
You also asked if you should “just flow the water through and not stir seeds?” I’m guessing you mean that you’re stirring the seeds in your grow trays when you water them? Once I pour them into the grow trays after soaking, I try not to touch or move them at all.
You mentioned that at day 7 you have a thin batch of fodder and about 1/2 unsprouted seeds. That sounds like some of your seeds are dead by the time you get them into the trays. That could be because of your bleach solution (maybe you’re using too much bleach, or soaking it too long?) or it could be that your oats aren’t good quality. I know when we tried soaking in vinegar instead of bleach, we’d have the same issues with lots of unsprouted seeds…. the vinegar was killing the seeds. I’ve never had that happen with bleach, though.
Sour smell and the fuzzy stuff is probably indicative of mold, but I don’t know for sure not being able to see/smell it. During the Summer, we have some issues with mold due to the heat and humidity. It grows just fine, though, and I just take the moldy fodder when it’s long enough and soak it overnight in a raw apple cider vinegar solution. Vinegar kills most types of mold, and I haven’t had any problems with any of the animals being sick from it after it soaks for a while (I’m hesitant to recommend that, though, for obvious reasons!)
Hope this helps?
Thank you SO much for answering! I have been trying for info several weeks now and yours is the only response.
I started by soaking about 5# of seeds in a capful of bleach plus water to cover the seeds for about 1/2 hour, a few times several hours, but never more. Then I rinse the seeds and set for about 12 hours in water to cover . The next step I was transferring the seeds into plastic bins with small holes, running water through to rinse twice a day and they sat in a non-hole bin and were covered in between the rinses. I did this for 4 days, at which point there were lots of sprouting roots, so I transferred the stuff into trays. Many of my trays (leftover greenhouse stuff) had holes too big for the oats, so I lined them with garbage bags, figuring I could tip cautiously to rinse, rather than draining water thru like in the bins. This is when I got the odor and possible mold, but both rinse out easily. Suggestion on the non-sprouting seeds? Using horse feed oats, no chaff, dust etc, bvery clean. Probably just “dead” and feed them to chickens? Lift off the “good” mat part to continue growing and dispose of dead seeds?
Hmmm… here are some thoughts, not sure if it will help, but for what it’s worth…
First, I soak seeds for a minimum of 12 hours in a bleach solution and I use a “glug” of bleach for about 8lbs of seeds (about half a cup, maybe?) I think a cap full might not be enough and I would definitely soak in the bleach solution for longer than a few hours.
Second, I would definitely transfer the seeds directly from the bleach solution to the bins with holes. One of the things that is pretty important to hinder mold growth is that the trays are able to drain completely. We have our holes drilled at one end of the containers, and they’re on the shelf at a slight tilt so there isn’t any water sitting in the containers. If you’re just tipping them, I’d be willing to bet there is a LOT of standing water at the bottom of your bins, which is going to invite mold.
We also try to water the barley (once it’s in the bins) four times every day but at the least, we water it three times each day. You want to keep the seeds moist, without water collecting in the bottom (hence the holes!)
As for the seeds that don’t sprout, we just feed them to the chickens.
Hope this helps, and please keep me posted!
Thanks again, Rina! I will definately try more bleach and longer time in it. Chickens got seeds today ..happy birds. I’ll let you know how it goes as I’m sure others are having my problems. I’d love to set up like you have but our laundry is pretty crowded as is and I can’t raise my arms above my shoulders so it takes a lot of space on low shelves. I’d like to get where I can produce the 15# daily required for horses (all 8 of them!) eventually, plus my hens and geese.
You’re very welcome! I’ve heard good things about people feeding their horses using fodder – and the best thing is that unlike our cow and goats, they don’t need to be provided with additional hay, so it’s probably a little cheaper to feed horses that way. Our system is still not quite what we’d like it to be, but one of these days we’ll get all the kinks worked out and do another post. 🙂 Looking forward to hearing how things go with you… hoping you have a better time this go-round!
Hi Rina,
Another question on seeds. Are you using seeds that would be planted (as opposed to feeding). I did find barley seed but some and the listed oats are treated. Can the critters safely eat the seeds if they have been treated? Do they grow better for fodder? Is organic better (I’m sure better health-wise, what about sprouting?) I’m thinking maybe “seed” types are tested for germination rates where “feed” they won’t care, and maybe one reason I get so much unsprouted seed?
I did find a LOT of water in my trays after your last helpful comments. I moved a mat of well started fodder to a tray with open crisscross bottom to see and despite the moving, it looks better.
I’m not really sure what “treated” means? We are using seeds that are listed as animal feed, but obviously they could also be planted and they still have the hulls and everything. I’m not sure whether organic or non organic would make a difference in sprouting (we’re using organic and I’ve never used anything else.) I’m sorry I can’t be more helpful about that!!!
Hi Rina,
On your chickens: Do you have laying hens and are you feeding ALL fodder or do you still use laying mash? I am currently using a combination of layer pellets, sprouted grains (sunflower seeds and corn mix) as well as the green fodder. But if I can feed all fodder and / or sprouts and still get decent eggs, that would be nice.
The horses are looking great and now wasting regular hay (good quality… bah humbug!!… NOW I have to get the kids to cut back on hay) even though only getting 1/3 the ideal amount. I am slowly upping production.
Thanks again for all your help.
Dorothy, we do have laying hens but they don’t seem to like the long fodder… if we feed it to them on day 2 or 3, they do well with it, but if we wait until day 7 or 8 a lot of it gets wasted. I really don’t know how they’d do with nothing but a barley, our chickens free range and they’re given some grain supplements. I’d say to try it out, and if you notice an decrease in egg production or lower quality eggs (ie fragile shells,) you should probably add grain!
Am I doing something wrong!? We have the fodder system in our livingroom and the first nine day round it didn’t stink. Now it smells so foul and its making the whole upstairs stink. I had taken a couple day brake in between cycles because we went away. The day that I had started up again I was in a rush and didn’t have time to clean the trays from the first time. Could it be because I didn’t clean the trays?
Kelli, I’m sorry but I honestly have no idea. Our fodder system would start to smell after a week or two, and we’d just dump out the old water and wash out the whole system (except the PVC pipe because we couldn’t get in there to clean it.) If you search through the comments section here, you’ll see where someone suggested a barley straw treatment for keeping mold and algea at bay. I haven’t tried it yet, but it might help?
Thanks for the help. I will look into that.
Update and good news. Using a 1/2 cup bleach for 8# seeds and soaking 12 hours: NO MOLD or odor!! Everything is looking great with good “grass” and far less unsprouted seeds. I am using a variety of scrounged containers, trying for as many as possible that will nest on top of each other. I pour water thru as all containers have holes. When a container develops the little white roots, I GENTLY move the seeds to a black garden flat with holes. These have more holes at one end so I can tip like Rina suggested. I soak these 10-15 min … whatever I have time for ..twice a day if I can, but often only ONCE a day!! The difference might be that I cover each flat with a piece of 3 ml plastic. It only lays on top as the grass grows, but its easy to see the water droplets keeping the seeds moist. I am still using oats which seem to take longer than barley and I have found (on mine) that they sprout at different days, so I can’t count on moving to a black flat on a given day in the cycle … some will be ready, others not for another day or so. That might be because of the variety of containers I’m starting with.
Thanks Rina for all your help!!
That’s fantastic news, I’m so glad to hear that it’s going better!!! Thank you so much for giving us an update!
Hi Rina I’ve been planning to do this hydroponic green fodder for a wile now. Yours is amazing I’m from Venezuela and we don’t get barley seeds, i found in the web that i can do it with corn can i use the same bins you have in the photo for corn ? and, what about the solution what do you recommend ?
Andres, I have never done corn before, but I don’t see why the same bins and bleach solution wouldn’t work for corn. It might sprout more slowly or more quickly, so you may have to play around with your days. Good luck, and please check back to let us know how it works!
Good day to all of you I started to grow the fodder for a experiment from your advice i took wheat, barley and corn,
first of all corn takes too long wheat did well barley took longer than the wheat. it is very hot by as so i think that might be the problem will have to create some cooler shed to keep temperatures right but first load went out to goats and chickens this morning. the only problem i have is that on certain websites it states that for every 100g you should get 6.4kg of feed it definitely didn’t do that mine only weighed 2.4kg can you plse tell me what i did wrong. Do you maybe put some nutrition spray or something on them
I checked your pictures again my root system is not as thick as yours further more it looks the same why? I water four times a day on most days might have skipped one or two waters but never less than three
It sounds like your seed is just growing more slowly than it normally does. Try giving it an extra day or two.
Hi, Themla, thanks for giving us the update on corn vs wheat vs barley! That’s really helpful to know! If you’re not getting as much fodder as you’d like, you might want to let it grow for an extra day or two. I know that ours will grow slower or faster, depending on the weather here. We don’t use any nutrition spray.
Thank you
Hello again Rina,
I am now doing enough OAT FODDER to help out feeding all my 8 horses. I switched from greenhouse trays and misc. scrounged containers to white dishpans ( 10″x12″ x 4″ deep). These hold 1 1/2 – 1 3/4# SOAKED seed and I am doing bleach at 2Tbs per 2 1/2# dry seed but found I can do a large bucket of seeds with no bleach..soak, drain, IGNORE till it sprouts, re-soak then into the dishpans. I stack the pans 4 or 5 deep and rotate at ONE RINSE per day for 2 days, then pan it up. Next day has sprouts, so pans get separated. 4th day (I don’t count the bleach / soak) there is short grass and pans go by the window. Day 5 or 6 grass is to top of pans. Day 7.. I can feed it with a good heavy mat, 6″ tall grass. Every stage is rinsed once daily & covered with plastic for humidity which seems to eliminate the muliple rinses, and I have even skipped watering a few times after day 4 with no problems.
My hens prefer spouts to layer mash and are laying like crazy. The geese love the grass part. And the horses are fat and sheddin slick although not up to the recommened 15# per day per animal. From 8# dry oats I get 20# of grass mat. Not as heavy as barley which is not available around us, but might just be what oats do.
Wow, Dorothy, that’s great! I wouldn’t have thought to cover them with plastic or stack the pans 4-5 deep… that would really save us on space and the amount of watering it takes, now that we’re hand watering (we need to fix a few things on our system.) I’m really glad you mentioned this, we may change some things around!
I got cheap plastic at a Dollar store (about $3). Originally cut one for each pan which left too much open air space so taped back together. My shelves hold 3 pans tipped to drain (all have holes 1/2 of lower end and at the edge) or 5-6 pans if flat. The plastic now covers and overhangs all side of the complete shelf of pans and you can see the humidity dripping. Dry cleaner bags work great too! I do flat or tipped depending how they look and feel ..dryer stay flat (dryer before rinsing) but if they look damp I set tipped. The stacking first couple days seems to generate a bit of extra warmth. I put top pan in to rinse becomes bottom), then set others into it in the original order, rinsing as I go. Let water drain thru the stack again then set back on the shelf, I usually leave the stacked ones flat and they will drip a bit more. I have stacked up to 6 but better at 4 or 5 as the center ones don’t seem to sprout quite as well. You have been a GREAT help for me ..hope this helps you a bit ‘payback” :-))
It is a huge help, and I’m going to try it! Thank you!!!
thanks for sharing this, Rina.
I’m new to foddering but am very interested.
Is this a complete feed for chickens or would it still need to be supplemented.
Larry, the chickens would still need to be supplemented with SOME grain, but this should cut down on your feed bill by quite a bit!
Thanks, Rina.
As soon as I get some trays, I’m ready to start.
Have the wheat already
Rina, as I have been browsing through the comments I was really intrigued with how well you answer everybody’s questions. All other websites have a place for comments, but the questions never get answered! My question for you is if I have mold growing in my fodder system, could I spray a bleach solution directly onto the seeds to kill the mold? Even if it is a really diluted solution? I really don’t want the fodder to be wasted as I have just started growing the fodder a few days ago. Thanks in advance!
Nick, although I try to answer everyone’s questions, I unfortunately don’t have an answer to yours!!! That’s something we’ve considered doing, ourselves, and technically the bleach OUGHT TO evaporate by the time you feed it to the animals, but I’ve always worried about it. The reality is that compared to what animals are fed on industrial farms (between the pesticides and the hormones and the routine antibiotics, etc.) it really shouldn’t make much difference (the bleach won’t actually HURT them,) but if you’re trying to manage them without (or with as few as possible) chemicals/pesticides, etc. it’s a tough call.
In the past, we’ve just let it mold (as long as it’s not excessive) and soaked it in a vinegar solution overnight, the night before we feed them. I wouldn’t do this with goats (they’re highly susceptible to illness from mold) but our cow has been just fine.
Just wanted to follow up with my progress on this.
I had wheat already so that’s what I started with.
I soak the seeds for 12 hours or so and I was using 1/2 capful of bleach and rinsing thoroughly when I put them in the trays.
By the 7th day I had grass about 3-4″ tall and have been feeding daily for 4 days now.
My girls (8 hens and 2 ducks) aren’t thrilled yet.
They are eating the bottom of the mats but none of the grass.
Yesterday, I started with ACV and can’t tell yet if that was a good or bad idea.
Today, I didn’t have any that was ready for some reason.
I don’t know if it’s because I stirred them later after they sprouted.
I saw that others do this.
I was trying to get more seeds to the top for a more complete sprouting
Larry, we noticed the same thing with our chickens, they loved the bottom but didn’t eat as much of the grass. We started feeding a little earlier, when the grass wasn’t so long, and had better results.
ACV as a soak hasn’t worked for us, the grass (we use barley) didn’t sprout as well, and what did sprout didn’t grow as long. I think the acidity in ACV might actually kill some of the seeds. That was just our observation, maybe it has worked for others?
As for stirring them, we try not to touch them at all after they form tiny sprouts… that was something I read from the big companies who sell sprouting systems… maybe the stirring damaged them somehow?
Thanks for the reply, Rina.
I’m thinking the stirring after they sprouted may have retarded them.
I went back to bleach last night.
I fed the girls my not as well grown grass today.
I haven’t been back up to see if they liked this better.
If so, I may be able to knock one day out of the growing cycle
Let us know how it goes, and hopefully Dorothy’s reply will help, too!
Hi everyone!,
Rina ..I sure don’t want to step on your toes when you were SUCH a help to me!! If this doesn’t fit …feel free to delete it. I thought it might help for Larry’s relatively small number of birds.
Re Larry’s comments / questions: For the summer I stopped doing fodder for our horses (they have plenty of good pasture and are easy keepers) but continued with chicken feed. We have about 30 chickens, 2 ducks and 4 geese. I was having problems time-wise keeping up with the regular fodder set-up (HUGE garden etc!!) so I went to a VERY simplified program for the birds. I use oats as barley is almost impossible to find here. I now have 2 buckets which I start with 5# of oats then fill the bucket with water. No specific amt ..just that there is plenty to soak in. NO BLEACH or vinegar. This soaks maybe 2 days. Then I dump each soaked oats into a drain bucket with small holes in the bottom & refill with new oats to soak. I generally have 5 or 6 buckets total sitting in my bathtub. For some reason, the buckets do NOT need daily soaking but it also does not hurt. They also do not need to be stirred. As I remember among my other ‘have to’ projects, I do dump water to drain thr each bucket. After a few days there are sprouts showing, a little longer has a few sprigs of grass showing at the top and a good root mass most of the way thru. Anytime I have sprouts or grass I feed it to the birds. I do not wait for a grass mat. What I have found is that each bucket lasts 2 days divided at a 1# container to the geese plus 1/2# waterfowl crumbles plus they are on pasture. (for reference, geese LOVE the grass mats during the winter). The 2 boy ducks are in with hens and young birds. They get the remainder of 1/2 bucket plus 1 1/2# layer mash. They are laying very well, look great and my meat chicks are very slightly under the gains expected from commercial feed. My birds all have pasture so I’m feeding the sprouts for protien etc at this time and do the regular fodder for winter when they have no greens to munch. I have had zero problems with mold or yuckies, occasionally a slight odor which is gone when I dump water thru once.
Oh gosh, Dorothy, don’t worry about stepping on toes, I’m glad you can offer Larry more help!!!
Pingback: 12 Creative and Innovative Homemade Hydroponics Systems - growlightreview
this is really good news to me. so you can successfully grow fodder on such simple DIY project and without any commercial nutrition solution? I am initiating a similar project to feed my 49 chicken.
Glad it’s helpful, and yes, you can!
In the experiments I have conducted with the fodder system, if you have laying hens you woill still need to feed them laying mash(or equivalent) along with the fodder. Egg production dropped off rapidly with fodder only .
Could u tell me how much fodder is to be fed to cows
Generally, they say to feed twice as much fodder as grain. So if you’re cow normally gets, say 5lbs of grain per day, you’d give 10lbs of fodder.
I’m not sure, exactly, generally speaking I believe they recommend feeding about 3x as much fodder as grain, in weight. I’m sure if you google it you ought to be able to find more information, but I would start there and watch their weight.